Micro Greens
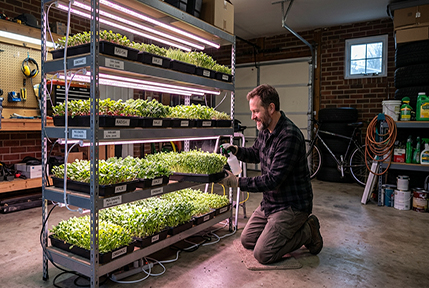 Growing microgreens offers many benefits for individuals and families seeking fresh, nutritious food with minimal space and effort. These young vegetable greens are packed with vitamins, minerals, antioxidants, and flavor, often containing higher concentrations of nutrients than their mature counterparts. Microgreens can be grown year-round indoors on a windowsill or countertop, making them ideal for apartments, small homes, or anyone with limited gardening space. They require little water, mature quickly—usually within one to three weeks—and provide a continuous source of fresh produce for salads, sandwiches, smoothies, and garnishes. In addition to improving nutrition and reducing grocery costs, growing microgreens can be an enjoyable and rewarding hobby that increases self-sufficiency and brings the satisfaction of harvesting fresh food at home.
Micro Greens Setup
If you're just getting started with microgreens, keep things simple and focus on learning the basics. Here are some good suggestions:
Start with Easy Varieties
Some of the easiest and most forgiving microgreens for beginners are:
• Broccoli
• Radish
• Pea shoots
• Sunflower
• Kale
• Mustard
• Arugula
• Cabbage
These germinate quickly and produce abundant harvests.
Use Shallow Trays
Special equipment isn't necessary. Shallow trays, food containers, or nursery flats 1–2 inches deep work well. Ensure there are drainage holes or use one tray with holes nested inside another without holes.
Use a Good Growing Medium
A light, well-drained medium helps prevent mold and promotes healthy roots.
You can grow microgreens in:
• Seed-starting mix
• Coconut coir
• Hemp mats
• Jute mats
Buy Quality Seeds
Purchase seeds specifically intended for sprouting or microgreens when possible. Avoid seeds treated with chemicals.
Sow Seeds Densely
Unlike mature vegetables, microgreens are planted closely together. Spread seeds evenly over the surface and gently press them into the growing medium.
Keep Seeds Moist but Not Soaked
Mist or water from below to keep the growing medium consistently moist. Excess water can lead to mold and poor growth.
Provide Adequate Light
After germination, place the trays in bright sunlight or under LED grow lights for 12–16 hours per day. Good light produces sturdy, vibrant greens.
Maintain Good Air Circulation
A small fan or simply avoiding overcrowding helps reduce mold and damping-off problems.
Harvest Young
Most microgreens are ready in 7–21 days. Cut them just above the soil line with clean scissors when the first true leaves begin to appear.
Grow Small Batches Frequently
Instead of planting one large tray, sow a new tray every week. This provides a steady supply of fresh greens.
Keep Records
Note which varieties you grow, how long they take to mature, and which ones you enjoy most. This helps refine your process over time
Experiment and Have Fun
Microgreens are inexpensive, quick to grow, and very forgiving. They are an excellent way to enjoy fresh, nutritious greens year-round and can be a first step toward larger indoor or outdoor gardening projects.
LINKS